Third Week Report
Create a Cloud IoT device registry and register a device
Before starting, ensure these steps are done:
- In the GCP console, go to the Manage Resources page and select/create a project.
- Make Sure Billing is enabled for your Google Cloud Platform project.
- Enable the Cloud IoT core and Cloud Pub/Sub APIs.
Prerequesites:
- Install and initialise the Cloud SDK.
- Setup a Nodejs development environment
- Alternatively, we can use Google cloud shell which comes with cloud SDK and Nodejs already installed.
Create a device registry
- Go to the Google cloud IoT Core page in GCP console.
- Click Create Registry and enter a name e.g. ‘my-registry’ for the Registry ID.
- Select your region from this region-list.
- Select MQTT/HTTP or both as per your requirements for the protocol.
- In the ‘Default telemetary topic’ dropdown list, select ‘Create a topic’.
- In the ‘Create a topic’ dialog, enter a name e.g. ‘my-device-events’ in the name field.
- Click ‘Create’ in the ‘Create a topic’ dialog.
- The ‘Device state topic’ and ‘Certificate value’ fields are optional, so you may leave them blank.
- Click ‘Create ‘ on the Cloud IoT Core page.
You’ve just created a device registry with a Cloud Pub/Sub topic for publishing device telemetary events.
Generate a device key pair
Open a terminal and run the following command to create an RS256 key:
$ openssl req -x509 -newkey rsa:2048 -keyout rsa_private.pem -nodes -out rsa_cert.pem -subj "/CN=unused"
In the following section, you’ll add a device to the registry and associate the public key with the device.
Add a device to the registry
- On the registries page, select ‘my-registry’.
- Select the ‘Devices’ tab and click ‘Create a Device’.
- Enter a name for Device ID e.g.’my-device’.
- Select ‘Allow’ for ‘Device communication’.
- Add the public key information to the Authentication fields:
- Copy the contents of rsa_cert.pem
- Select ‘RS256_X509’ for the ‘Public Key Format’.
- Paste the public key in the ‘Public key value’ box.
- Click ‘Add’ to associate the ‘RS256_X509’ key with the device.
- The ‘Device Metadata’ field is optional, leave it blank.
- click ‘Add’.
You’ve just added a device to your registry. The RS256_X509 key appears on the ‘Device details’ page for your device.
Run a nodejs sample to connect a virtual device and view telemetry
- Get the Cloud IoT Core Node.js samples from Github. The Cloud IoT Core Samples are in the IoT directory.
$ git clone https://github.com/GoogleCloudPlatform/nodejs-docs-samples
- In the cloned repository, navigate to the iot/mqtt_example directory. You’ll complete the rest of these steps in this directory:
$ cd nodejs-docs-samples/iot/mqtt-example
- Copy the private key you created in the previous section to the current directory.
$ cp ../../../rsa_private.pem
- Install the Node.js dependencies:
$ npm install
- Run the following command to create a subscription to the registry’s Pub/Sub topic, substituting your project ID:
$ gcloud pubsub subscriptions create \
     projects/PROJECT_ID/subscriptions/my-subscription \
     --topic=projects/PROJECT_ID/topics/my-device-events
- Run the following command to connect a virtual device to Cloud IoT Core using the MQTT bridge, substituting your project ID:
$ node cloudiot_mqtt_example_nodejs.js \
     mqttDeviceDemo \
     --projectId=PROJECT_ID \
     --cloudRegion=REGION \
     --registryId=my-registry \
     --deviceId=my-device \
     --privateKeyFile=rsa_private.pem \
     --numMessages=25 \
     ---algorithm=RS256
The output shows that the sample device is publishing messages to the telemetary topic. Twenty-five messages are published.
- Run the following command to read the messages published to the telemetary topic, substituting your project ID:
$ gcloud pubsub subscriptions pull --auto-ack \
    projects/PROJECT_ID/subscriptions/my-subscription
- Repeat the ‘subscriptions pull’ commmand to view additional messages.
To see the official documentation from where this post is inspired, please check : quickstart google iot core
Create a linux ( Ubuntu 18.04 ) Virtual Machine ( VM ) in Google Cloud Platform
Prerequesites :
-
Ensure that you have created a project in Google cloud platform before starting this tutorial blog.
-
Make sure that billing is enabled for your Google Cloud Platform project.
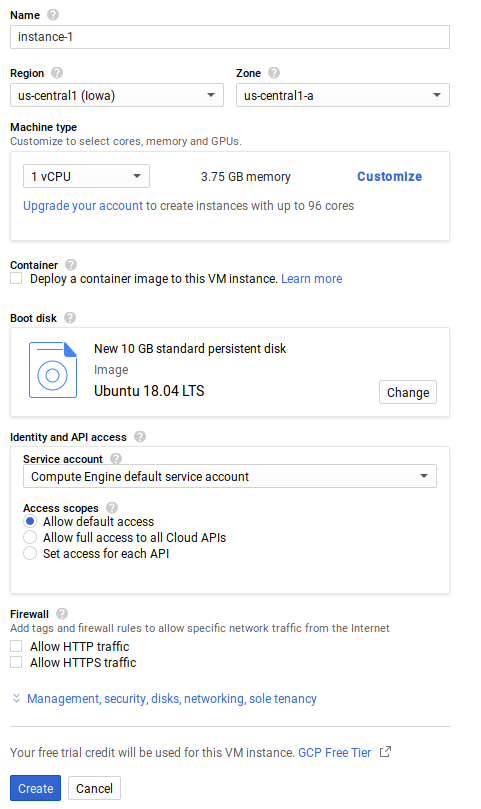
Create a Virtual Machine ( VM ) instance
- In the GCP Console, go to the ‘VM Instances’ page.
- Click ‘Create Instance’.
- In the ‘Boot disk’ section, click ‘Change’ to begin configuring your boot disk.
- On the ‘OS images’ tab, choose ‘Ubuntu 18.04’.
- Click ‘Select’.
- In the ‘Firewall’ section, select ‘Allow HTTP traffic’.
- Click ‘Create’ to create the instance.
Allow a short time for the instance to start up. Once ready, it will be listed on the VM instances page with a green status icon.
Connect to your Instance
- In the GCP Console, go to the ‘VM Instances’ page.
-
In the list of virtual instances, click ‘SSH’ in the row of the instance that you want to connect to.

- A Terminal window would open, which will let you access the VM instance that you have just created.
Running a basic Apache web server
Prerequesites :
- Create a Linux Instance using the above steps or follow this guided blog.
- While creating your VM instance, scroll to the Firewalls section and check the ‘Allow HTTP Traffic’ box. Checking this box enables the External IP address.
Install Apache
- Use Debian package manager to install apache2 package.
$ sudo apt-get update && sudo apt-get install apache2 -y - Overwrite the Apache Web server default webpage with the following command:
$ echo '<!doctype html><html><body><h1>Hello World!</h1></body></html>' | sudo tee /var/www/html/index.html
Test your server
Test that your instance is serving traffic on its external IP:
- Go to VM Instances page in the Google Cloud Platform Console.
- Copy the external IP for your instance under the ‘EXTERNAL_IP’ column.
- In a browser, navigate to ‘http://[EXTERNAL_IP]’.
You should now see the “Hello World!” page.
Create a subscription to the registry’s Pub/Sub topic, substituting your project ID:
$ gcloud pubsub subscriptions create \
    projects/PROJECT_ID/subscriptions/my-subscription \
    --topic=projects/PROJECT_ID/topics/my-device-events
Run the following command to read the messages published to the telemetry topic, substituting your project ID:
$ gcloud pubsub subscriptions pull --auto-ack \
    projects/PROJECT_ID/subscriptions/my-subscription
Repeat the subscriptions pull command to view additional messages.